Saturday, June 4, 2016

The dos and don'ts of string art

There are lots of ways to do string art but there are a few dos and don'ts to keep in mind! 

Dos: 
Use a softer wood (like pine) so that when you nail it goes in with ease and doesn't split the wood too easily! 

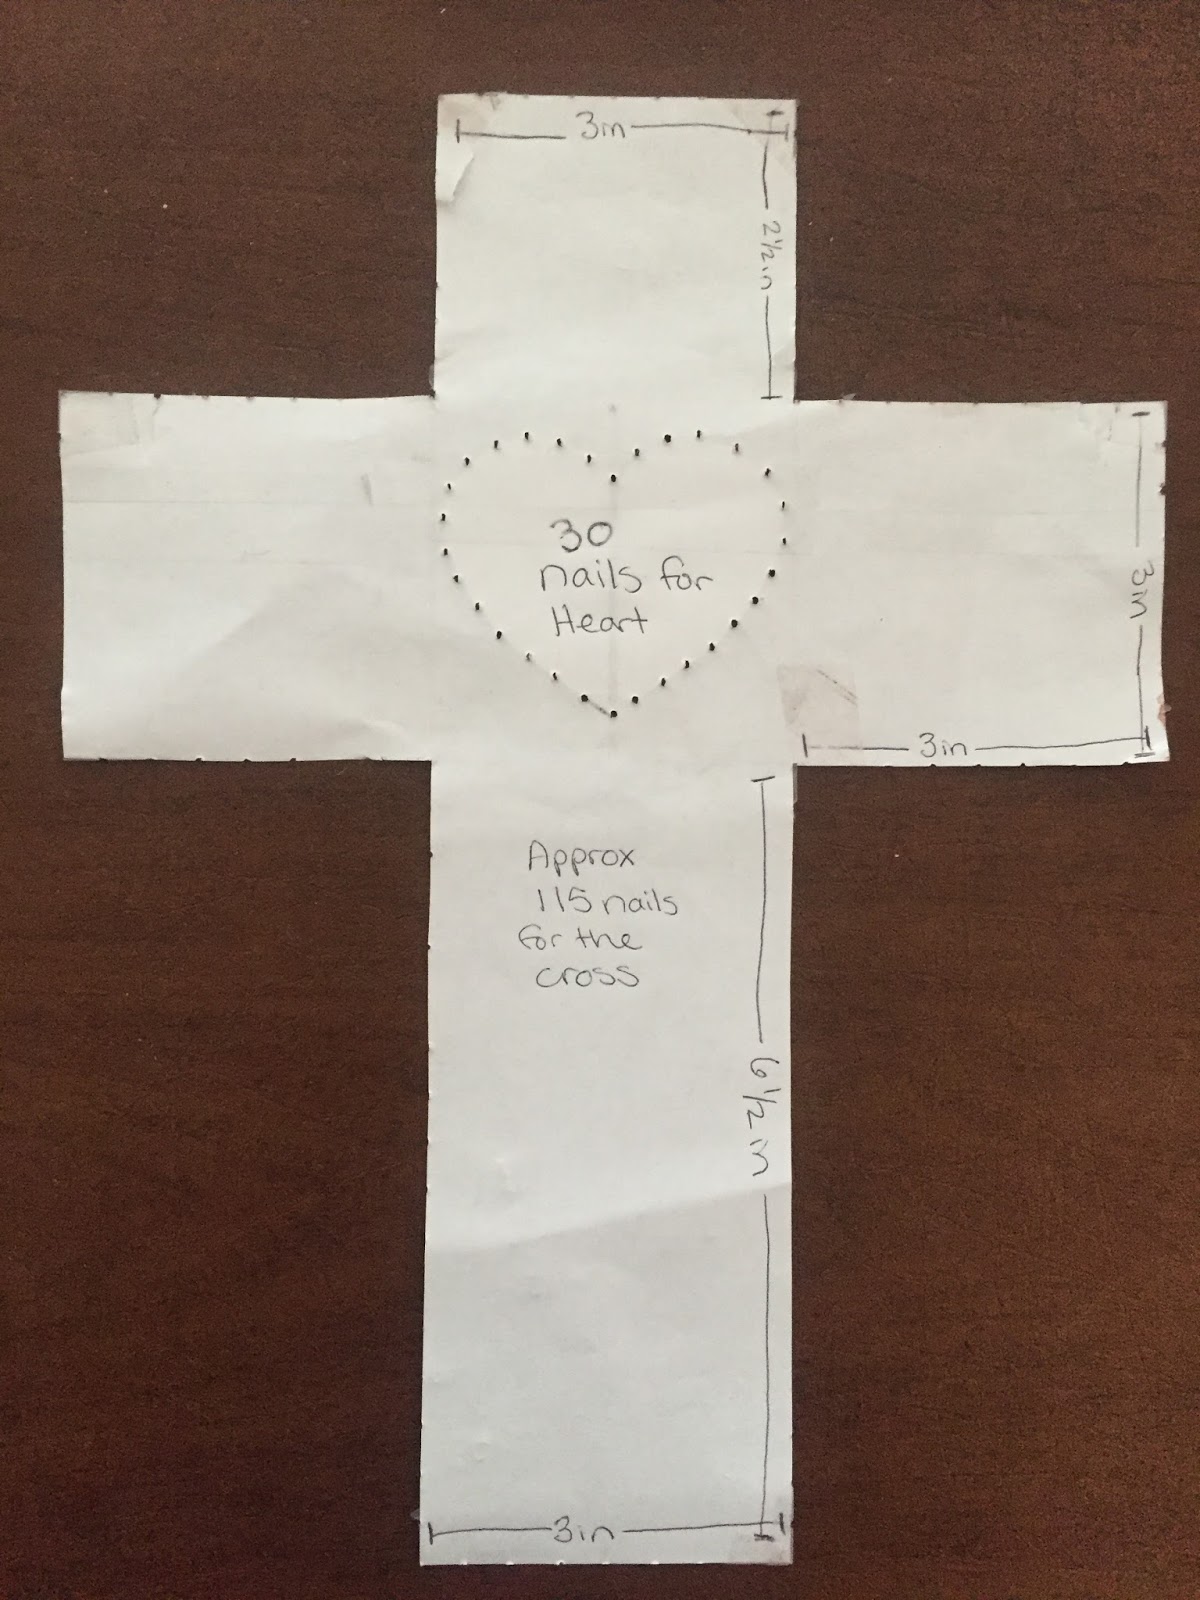
Before you begin nailing tape on your design and prehole your marks using an ice pick. This will allow you to pull the paper off before you begin nailing so that little pieces of paper don't get stuck under your nails! 


Here is a picture of some of the basics I like to use! 
 
Hammer the nails in far enough (about half way) so that when you pull string around it the nails don't pull out or loose shape. 

Hot glue the ends of your string with a small dab of glue so that the knots do not pull out easily! 

Don'ts:
Be careful not to hammer all the way through the wood!

Don't hammer your fingers holding the nails! (I know this seems silly to mention but yet its so easy to do!!) I like to hold my nail with small needle nose plyers so that my fingers are more back and less likely to get hit! 

Don't wiggle the nails too much once they are in the board as it will make the hole larger and compromise the integrity of the hold. If you don't like the nail how it is just pull it up and out as smooth as possible. 

Don't use a hard wood!! (Yes I know I'm being redundant here from the Dos section!) If you don't get a soft enough wood it will make your project a nightmare! Not to mention your nails will be more difficult to get straight and in far enough. 

Don't nail too close to the edge of your wood as it could easily split your wood. The more nails that are in a line following the grain of the wood, the more likely you can split the wood so be aware! 
This example shows how close I put the nails along the bottom edge of the board and my wood cracked a bit! I had to use wood glue and clamp the wood along the whole project to get the wood to stick back together again and hold the nails in! 
 
Don't nail over a knot in the wood! The knots are extremely hard to nail into and can compromise your wood integrity if not careful! 

How to do string art

At the end of April I had the joy of attending a mother daughter retreat with my mom and daughter at Cedar Brooke camp! We had such a great time together and I even had the opportunity to teach a string art class! All the adults had the option to do their first or last initial or a cross with a heart inside. 
The young girls got a pre-nailed heart board that used nails with bigger heads so that the string or yarn would catch on it easier! My daughter is 5 and she did this one all on her own!

 We had so much fun working on these and it was cool to see all the colors everyone chose to use! The beauty of string art is that there is not wrong way to do it! You can find a pattern or do it random all over! 

When I taught the class I started out describing to everyone the necessity of nailing in the nails far enough (about half way) otherwise the strings would pull on the nails turning your heart into a blob! Even for the initial, if the nails aren't in far enough they will pull and loose shape. Be careful to not hammer too far as you will go through the wood then! 

Next thing to keep in mind is distance between the nails. You don't want them too close or too far apart. Usually about 1/4-1/2 in apart is good depending on how tight a curve you want to make. 

Once you've got your project all hammered you'll want to start stringing! Start by tying the string around the nail of your choice and then double knotting it! I like to place a dab of hot glue on the end of it to help it stay. 

Next you can start to string away! A project like the cross where you want that radiating effect you'll have to a little math. Divide the number of outside nails (around the cross) by the number of inside nails (around the heart) and that will tell you how many nails you have to go around the outside per every one on the inside. So each of the inside nails will have multiple strings around it while each of the outside nails will only have one string around it. The math for my cross pictured was something like 3.78 so for some of the nails I wrapped around 3 times and some I did 4 times (you can't half wrap a nail😊) 
Once you have completed stringing your project you again knot and double knot the string around the nail of your choice and then put a small dab of hot glue on it to seal it! 

Hope that helps if you want to do your own string art or want to teach someone else! 


Sunday, March 6, 2016

String Cross with Heart

I've been wanting to make this design for sometime now! A friend recently told me she wanted a faith based string art and that gave me the motivation to give it a try!

  Cross with Heart Sting Art

I started with a pine board 14in by 11.25in in size and stained it with a dark red mahogany stain.

Cross with Heart Sting Art

I created my own cross shape, dimensions pictured above. As labeled on the cross I used 30 nails to make up the heart and 115 nails to make up the cross. The more nails you use the more dense the string will be.

Cross with Heart Sting Art

Once you've got your cross and heart all made up you'll want to tape it onto your board so that it is in the position you want to be finished in. Don't worry you can hammer right through the tape!

 Cross with Heart Sting Art

Next I like to use an ice pick to pre-hole where i want my nails to be. This also allows me to pull the paper off without leaving little pieces under the nails. Once it is all pre-holed you want to start in on the nails, hammering them in about 1/3 of the height of the nail.

Cross with Heart Sting Art

Once you've got all the nails in you get to start in on the string! I started my string at the top of the cross in the center. Tie the string into a double knot and hot glue it with a little dot so that it seals it off. I also divided my 115 nails from the cross with the 30 nails from the heart putting that at about 3.8. So I went around each of the outer nails once and put three or four loops around one heart nail and then moved to the next set of four nails on the cross for the second heart nail. Be sure to push down the strings on all the nails so that they don't slip off too easily! 

End of the Year Teacher Gift

I wanted to create a unique teacher gift for my child's teacher this year that would be memorable and something she could keep and display for years to come! What better a symbol for a teacher than an apple and a pencil! 


In these projects I used pine wood and then stained them with a red mahogany stain. Next I used both the apple and the pencil templates and taped them on my dried board. I like to use an ice pick to make indentations where I want my nails to be and follow my paper template. This way when I peel the paper up there aren't little pieces stuck under the nails that are too difficult to get off. Once I'm done with that I'm ready to put the nails in! Time to hammer away!

Now that all the nails are in its time to get your string on. Be sure to know what should go first for the proper layering effect! On the pencil I start with the pink eraser and the tan wood part of the pencil between the black tip and yellow pencil. Next comes the black tip and the yellow pencil body. Finally finishing it off with the silver metal part between the eraser and body of the pencil. At the beginning and end of each string and color I tie two simple knots and then put a dab of hot glue on it to secure it in place.

Once my nail art is done I move onto the painting. You can use a template that you can get from Joann's or Michael's or create your own by printing up the font and size you want and cut those letters out (that's a bit more work). Now you've got a unique and fun teacher gift that your child's teacher can treasure forever!